
 This week I am mostly working on more dolls.
But a change is as good as a rest, as the saying goes, so in between that I have another project underway.
I have never made a fabric wreath before, but I am having a go at one.
Being somewhat pushed for time this week, and hating to waste anything, I thought I’d recycle the flannelette flowers I made to go with my appliqué for Sherwood Art Week in the summer.
 I may have already mentioned that my friend Maria is organising a fabulous event on Saturday – the Sunshine Vintage Bazaar, which will be held in the historic Galleries of Justice (formerly Nottingham’s old courthouse and gaol and now a museum of crime and punishment).
 One of her many great ideas for the event is to invite crafters to make wreaths to decorate the fair, which will then be sold for charity.
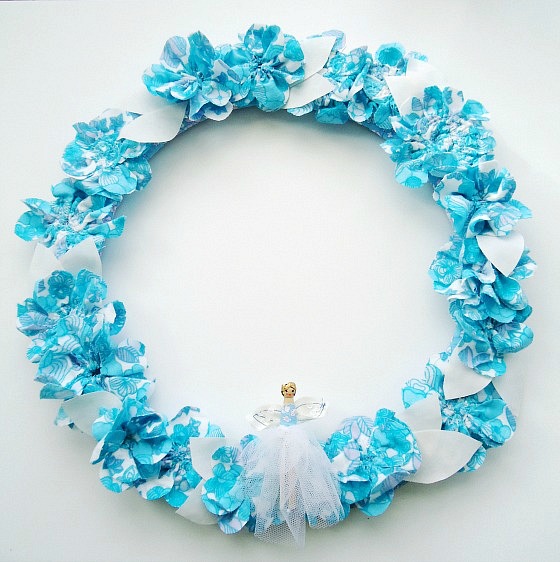
Maria provided me with a wire wreath frame, which I’ve wrapped in layers of quilt wadding and then wound with fabric, before sewing on the flowers.
 It’s still a work in progress. But before I’d even sewn the flowers on I knew it still needed something…
So I added a few white fabric leaves, and gave my discarded peg doll a fairy makeover…
 Et voilà – a fairy ring!
 I can’t quite decide whether to sit her at the top or the bottom of the wreath (she’s not sewn on yet.)
But either way, despite it’s glamorous new inhabitant, I think my fairy ring still needs a bit more bling.
Time to get the sequins out again. ♥
![]()
Update: finished it!

![]()
Definitely more sequins! She has a Louise Brooks vibe, your fairy; maybe a bit of silver lame to echo her era? Lovely idea, very pretty.
Ahh, I have silver and white sequins, will they do?!
I love the color and feel! With or without bling it’s just so cheerful. Needed that this morning 🙂
Oh, I love the colors you’re using! That is one lucky fairy!
Oh my, how I wish I lived near you to go to the bazaar. Your wreath is full of sweet charm.
Thanks Sharon! Hopefully it will help raise some funds for charity.
Love that wreath you made! I am still staring at the your photos trying to find out how you made the flowers and the wreath. Any chance that you might enlighten me? Thanks for sharing!
Hi Ompompali, the flowers were made similarly to this photo:
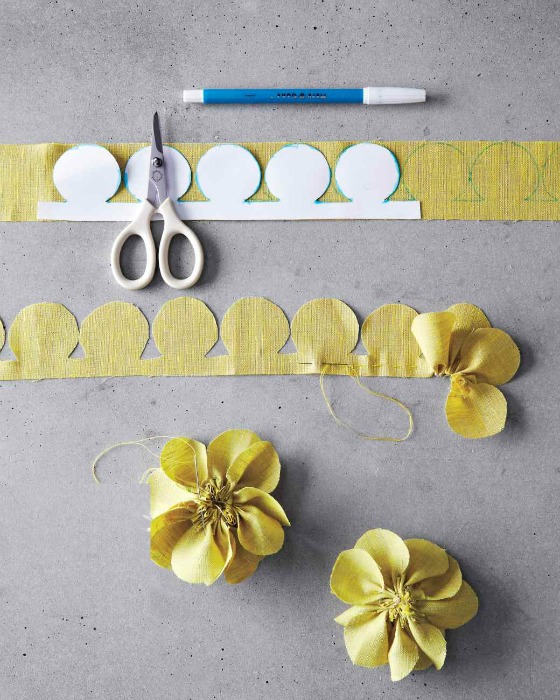
I didn’t use a template though. I folded my strip of fabric so that I was cutting several layers at once (to speed things up) and just cut the shapes out roughly. They really don’t need to be that neat.
I then machine-stitched over the centres of the flowers in a sort of spiral, to make them more robust.
The base of the wreath itself started life as a bought 18 inch metal wreath ring, which I wrapped first in several layers of leftover polyester quilt wadding.
Then I ripped long strips from some thin fabric and wrapped those around to cover the wadding, folding the edge under as I wrapped so that no raw edges were on show.
I stitched the ends in, sewed on the flowers by hand, then embellished with sequins and mini pompoms and stitched on the peg doll to finish. Et voila!
Aah….it’s so kind of you to give me such a long and informative answer – makes me very happy :-)))) And I have understood perfectly well how you made the wreath so there is nothing to stop me from starting ….except all the Christmas presents that still need to be finished (!) So this is beautiful project to start the New Year with. Thanks again a million! Best wishes from Germany
You’re most welcome Ompompali! If you do get around to making a wreath I’d love to see a picture of it!
I’ll do my very best :-))